 Sam Hills
12 min read
The guide to underfloor heating thermostats
It won’t be long before we start thinking about turning the heating on to combat the chill of the winter months. As the heating season fast...

In this second part of our guide ‘Why is my underfloor heating not working?’, we continue with our top trouble shooting tips if your electric underfloor heating is not working. But this time, we take a look at anything associated with the thermostat.
If you have missed part 1 of the troubleshooting guide, covering power, heating cable and the sensor probe, read the blog here.
Sometimes a simple error in the wiring is all that needs to be rectified.
All of our thermostats have labelled electrical terminals on the back of the unit and wiring diagrams in the instructions so it should be relatively easy to check whether the wiring is correct or not. You should only check this yourself if you are competent with electrics, and always isolate the electrical supply before performing any maintenance or check on any electrical circuit.
To check the wiring you need to pop the thermostat display off of its mounting plate and undo the mounting screws. You can then pull the thermostat away from the wall and compare the wiring in your thermostat with the wiring diagram. If you are not sure whether its correct or not you can take a photo and send it to our customer service team to check for you. We will be able to confirm if anything need adjusting and what to do next.
The mounting methods and wiring arrangement is slightly different for each thermostat so make sure you have a copy of the instructions for your thermostat before you start. You can download them from our website or watch one of our wiring videos for each of our thermostats which can be found on our YouTube channel.
Sometimes there might be a simple change that you need to make within the settings menu on your thermostat to make your heating switch on. Sometimes it is best to do a factory reset and start again. Our customer service team will be happy to guide you through that process over the phone so feel free to give us a call!
Your thermostat measures the temperature of the room or floor. The heating will only come on if the temperature you have requested is higher than the measured temperature of the floor.
The first thing to check is the measured temperature and the set or desired temperature. You can do this by looking at the screen on the thermostat. On our most popular thermostat, the programmable thermostat (SCP-W), the measured temperature is the big number on the left-hand side of the screen and the set temperature is the small number on the right.
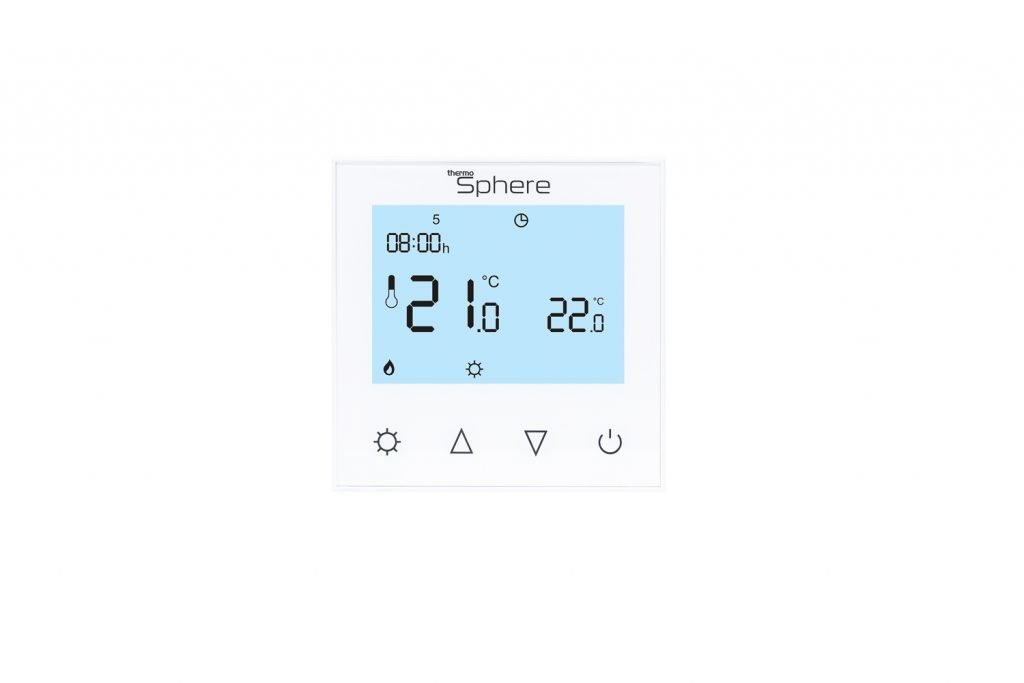
For the heating to come on the set temperature must be higher than the measured temperature. For example, if the set temperature and the measured temperature are both 20°C the heating will not come on. But, if you press the up arrow to change the set temperature to 24°C, you will see the flame symbol show up on the display and hear a ‘click’ sound. The flame symbol is there to tell you that the thermostat is calling for heat and the heating is switched on. The ‘click’ sound is the actual switch or relay switching the heating circuit on. When the heating reaches the set temperature the flame icon will disappear and you will hear the relay click off again. This is your heating switching off. The thermostat does this automatically to maintain your desired temperature.
In manual mode the thermostat will simply maintain the set temperature until you change it. In program mode you can set a different temperature for a range of times for different days and the thermostat will automatically change and adhere to your preset heating schedule. More about that in the next paragraph!
If you have a heating schedule set up on your thermostat the heating will only come on during the set on times, if the temperatures are set correctly. A good maximum floor temperature to work to is 27°C as this is the recommended maximum temperature written into the European and British standards. To check and edit the heating schedule on the popular Programmable Thermostat you first need to switch the thermostat off by pressing the power button. Then press and hold the settings button for 5 seconds to enter the timer settings. Skip through the clock settings by pressing the settings button several times. Now you’re into your heating schedule!
You will need to cycle through the heating times and temperatures to make sure they are set to a sensible level. For example, you might want to set the heating to come on at 22°C from 6am to 9am every day, drop back to 18°C until 5pm and then heat up to 22°C until 10pm. Cycle through the schedule and adjust the settings to fit your needs.
If you need help with this there is a video on our YouTube channel or you can call our customer experience team who will be happy to help you set up your schedule over the phone.
LEARN MORE ABOUT OUR THERMOSTAT RANGE
Each thermostat is designed to work with a floor temperature sensor, a built-in ambient air temperature sensor or both sensors at the same time. If you don’t know which sensor your thermostat is using it can be confusing! For example, the floor could be 5 degrees warmer than the air and if your thermostat is using the floor sensor and you set the temperature to 22°C, the heating will switch off when the floor reaches 22°C but the room might only be at 17°C and still feel cold! This might lead you to believe that the thermostat or floor heating is not working correctly but if fact everything is working fine, you just need to set it up differently to achieve your comfort levels.
A good exercise to do when you first get your underfloor heating system is to experiment to see what temperature is comfortable for you. It can take a bit of your time to set up, but is so worth it in the long run because you know what your most comfortable set temperature should be, what floor temperature you need to achieve it and you can set up your thermostat to run as efficiently as possible. Set your thermostat to use the floor sensor, set it on manual mode, set the temperature to 25°C and wait for the floor to heat up. You should leave the room like this for at least a couple of hours so that everything warms up. Now go back to the room and feel whether it is comfortable for you or not. If it’s too hot, turn it down, or if it’s too cold, turn it up. Leave the room for a while again and come back to test whether it’s comfortable. Repeat this until you find the right temperature for you. Now you know the floor temperature that you need for your room to feel comfortable! Winning!
After that, switch the thermostat to use both sensors. In this mode the thermostat will show you the ambient temperature of the room. So now you know the ideal room temperature for you by ‘feel’ which is the best way. You can now set that temperature as your desired temperature in your heating schedule. Your thermostat will also monitor the floor temperature so that it doesn’t rise above a maximum setting. You will need to make sure that the max temperature limit is not set below the floor temperature that you need for the room to feel comfortable. Check out the instruction manual to see how to do that. If you have timber, laminate, carpet or vinyl floors it is not recommended to set your floor heating to more that 27°C so please be aware of that and set the floor limit accordingly. If in doubt you should always check with the floor finish manufacturer.
That’s it! Hopefully part 2 of our top troubleshooting tips in helping to identify any potential problems with your underfloor heating has helped. But, if you do have any questions, please contact one of the team.

12 min read
It won’t be long before we start thinking about turning the heating on to combat the chill of the winter months. As the heating season fast...

12 min read
In this first part of our guide ‘Why is my underfloor heating not working?’, we cover; towel test, power, circuit check and sensors. But if it’s...

9 min read
It’s great that you are thinking about installing underfloor heating for your next project. You’ll receive all the benefits that come with underfloor...